Developed by OARnet video and engineering staff
Videoconferencing equipment is often installed in any available room without regard for lighting. Typically, the only lighting is the fluorescent ceiling lights. Since this light comes primarily from above, it causes shadows, uneven illumination and the common "black eye" facial appearance. Often, the bulbs do not have a daylight finish, so colors do not appear realistically.
We conducted a number of experiments and developed several inexpensive, easy-to-install lighting improvements that you could easily adjust to fit your needs.
Our primary goals were to:
- Better illuminate participants' faces by positioning lighting in front or slightly below them.
- Avoid shadows by creating diffuse and widespread lighting.
- Render more realistic colors.
- Avoid glare and reflections in participants' eyeglasses.
Based on the research, we made the following five renovations to our videoconferencing room. Before and after photographs are shown at the end.
-
Paint the monitor/camera wall white.
This diffuses light, which enhances illumination. Our walls were originally painted light blue, as recommended by the video system manufacturer.
Valspar Interior Latex Drywall Primer white, 1 gallon, model 007.0260948.007 — $12
Available at Lowes.A student employee painted the wall using previously purchased brushes and rollers.
-
Make the conference table white.
The reflection provides upward illumination on participants' faces. It also improved the overall aesthetic of the room. We used whiteboard material, which conveniently allows users to write notes. It comes in rolls of various widths. It is easy to apply and is removable.
Whiteboard material to cover a 4-by-10-foot table — $200
Available at http://mywhiteboards.com/optiriteeasy.html -
Install large, fluorescent light fixtures adjacent to the monitor/camera wall
The fixtures create widespread, uniform illumination. We installed the two light fixtures on the walls adjacent to the monitor/camera wall and filled each with four fluorescent daylight bulbs.
The exact location of the fixtures is not critical. As you will see in the photographs below, we had to avoid a door and a projection screen, so our fixtures are not installed at the same angle on either side. We also tried installing these lights below the screens. This improved illumination, but caused unacceptable reflections in eyeglasses, so we do not recommend it. We looked for fixtures with a large surface area and uniform illumination.
Lithonia Litepuff Linear, model 10642RE — $50 each
GE Daylight Ecolux T8, pack of 2, model 29566 — $4 each
Both available at Home Depot.E-Z Ancor Hollow Wall Anchor, pack of 50, model 25310 — $12
Real Organized 8" White Shelf brackets, 4 brackets (manually cut to size), model 21139PHLLG — $0.98 each
Both available at Lowes. -
Install bare, single-bulb fluorescent fixtures behind the monitors.
This reflects indirect light for a subtle improvement in lighting. We installed our fixtures facing upward onto the white wall. Our monitors are tilted downward, so there is room behind the tops of the monitors to install these. As an unexpected benefit, it also provides a modernistic and elegant ambience when the other lights are turned off.
Utilitech 51-7/8" Utility Fluorescent Strip Light, model 52479 — $21 each
Available at LowesUse the same GE bulbs and brackets as above.
-
Turn off the overhead lights.
This helps avoid shadows and shine on monitors, which makes them look dimmer. Overhead lights will not be needed once our suggested lighting has been installed. Though the room will be darker than before, the automatic exposure adjustment of the cameras compensates for this. The darkness of the room also draws the eye to the screen, instead of being distracted by visual clutter.
Research and installation by:
Dr. Robert Dixon and Kenneth Fox, video technicians
James Rader, facilities manager
David Covert, optical engineer
Dana Rich, video conferencing student assistant
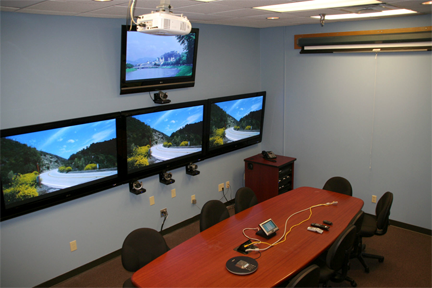
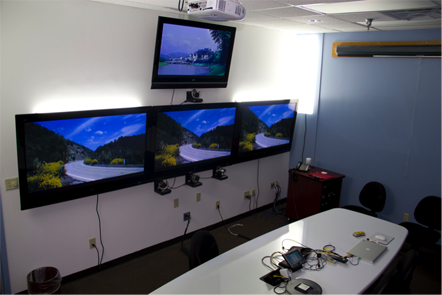
Videoconferencing room prior to changes.
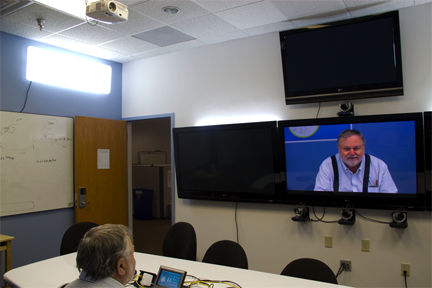
Adjacent left side after renovations. The overhead lights are left on in the picture to more clearly show the room layout. We installed the large light horizontally to avoid the door.
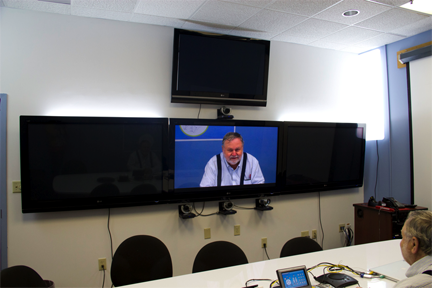
Adjacent right side after renovations. Again, the overhead lights are on. We installed the large light vertically to avoid the projection screen.
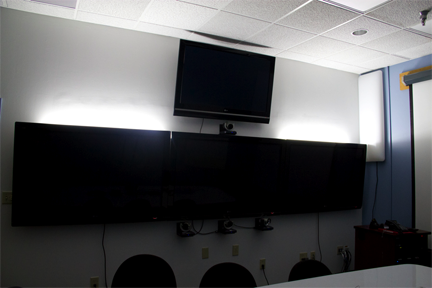
Videoconferencing room with only the lights behind the screens illuminated, which creates a nice ambience.
The final result, with the new lights on and overhead lights off. Compare this with the before picture.